
When you’re working with HVAC systems, understanding how to use an HVAC gauge can make all the difference in ensuring efficient performance. This guide covers everything from the types of gauges available to the essential tools you’ll need and how to set up your gauge correctly. You’ll also learn about taking accurate readings and troubleshooting common issues that can arise. The key to mastering this skill lies in the details and proper technique, and once you grasp these fundamentals, you’ll be well-equipped to handle any HVAC challenge that comes your way. Ready to enhance your HVAC expertise?
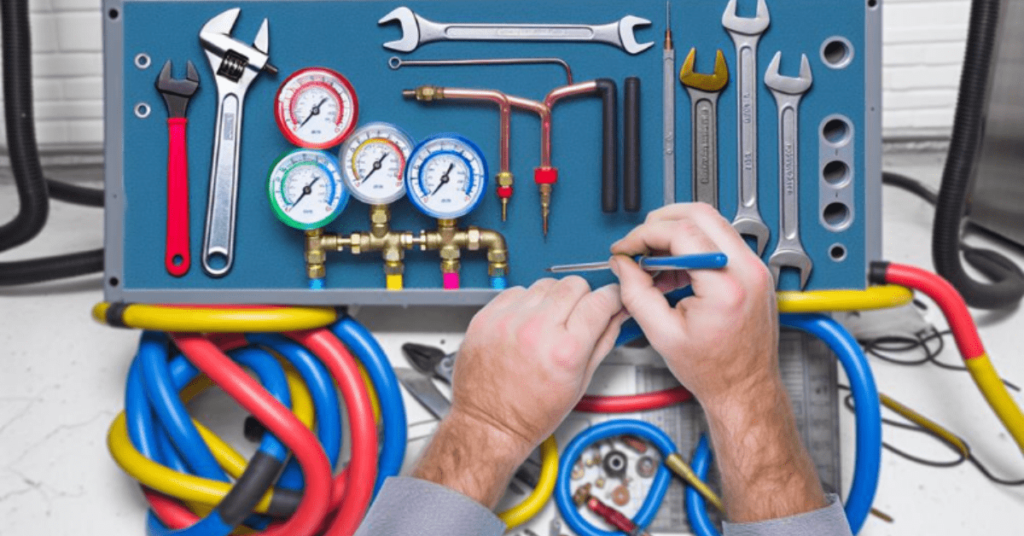
Types of HVAC Gauges
Understanding the different types of HVAC gauge is crucial for accurate system diagnostics and maintenance. You’ll primarily encounter two categories: digital and analog.
Digital gauges offer precise readings and often include features like backlit displays and data logging, which can streamline your diagnostic process. Analog gauges, on the other hand, are more traditional and rely on mechanical needles to indicate pressure levels. While they may lack the advanced features of digital models, analog gauges are typically more durable and resistant to harsh conditions.
When deciding between manifold and single gauges, consider your requirements.
A manifold gauge set consists of multiple gauges connected by a manifold, allowing you to measure both high and low pressures simultaneously. This type is essential for tasks like evacuating and charging refrigerants. Single gauges, however, measure one pressure type at a time and are more compact, making them suitable for quick, specific measurements.
Essential Tools and Equipment
To efficiently utilize your HVAC gauges, you’ll need to assemble a toolkit that includes a variety of specialized instruments and accessories. First, ensure you have a high-quality manifold gauge set, which consists of two gauges and color-coded hoses. These are essential for accurate pressure readings.
A reliable vacuum pump is critical for evacuating air and moisture from the system. Acquire a digital thermometer for precise temperature measurement, as this ensures proper maintenance and enhances system efficiency.
Invest in a leak detector to swiftly identify refrigerant leaks. A micron gauge is indispensable for measuring vacuum levels during evacuation. A refrigerant scale will help you measure refrigerant accurately, crucial for the correct usage and charge of the system.
Don’t forget a multimeter to test electrical components and a set of wrenches and screwdrivers for mechanical adjustments. For proper maintenance, include refrigerant oil and a set of replacement O-rings to prevent leaks.
Always have safety gear, such as gloves and goggles, to protect yourself from refrigerants and other hazards. This comprehensive toolkit ensures you can effectively manage your HVAC system, ensuring longevity and optimal performance.
Setting Up Your HVAC Gauge
Before connecting your HVAC gauge, ensure all valves are closed to prevent accidental release of refrigerant. Begin by calibrating the gauge according to the manufacturer’s instructions. Calibration is crucial for obtaining accurate readings and involves setting the gauge to a known standard pressure. Use a calibration rig if available, or compare against a certified reference gauge.
Next, attach the gauge manifold to the system. Connect the high-pressure hose to the high-side service port and the low-pressure hose to the low-side service port. Ensure the connections are secure, as loose fittings can lead to erroneous readings and potential hazards.
Once connected, initiate pressure testing to confirm the integrity of the connections and the system. Open the high and low side valves on the manifold gauge briefly to equalize the pressure. Monitor the gauge readings for stability. Any rapid fluctuations indicate a potential leak or improper connection, necessitating immediate rectification.
Taking Accurate Readings
Ensure the system is stabilized and the gauge readings are steady before proceeding to take accurate measurements. Begin by verifying the integrity of the calibration; this ensures your HVAC gauge provides precise data. Calibration tips include periodically checking against a known standard and adjusting as necessary. An uncalibrated gauge can lead to inaccurate data interpretation, which might result in misdiagnosed system issues.
When taking readings, ensure the connections are secure and free from leaks. Use the high and low-pressure ports correctly—these are critical for obtaining accurate readings. Monitor the temperature and pressure levels simultaneously, as discrepancies can indicate potential system malfunctions. Proper usage of your HVAC gauge requires familiarity with these parameters and their expected ranges.
Maintenance tips for your gauge include regular cleaning, checking for wear and tear, and ensuring the hoses and connections are intact. Always store the gauge in a protective case to prevent damage. By following these steps, you ensure your equipment remains reliable and prolong its lifespan.
Accurate readings are vital for effective system diagnostics and maintenance, so never overlook the importance of these preliminary checks and ongoing maintenance practices.
Troubleshooting Common Issues
When troubleshooting common issues, identifying symptoms such as unusual pressure readings, inconsistent temperatures, or unexpected noises can help pinpoint potential problems in the HVAC system. Start by examining the pressure gauge to detect any pressure fluctuations. Low pressure often indicates refrigerant leaks, which compromise system efficiency. Use a leak detector to locate and repair leaks promptly.
Next, assess the condenser fan operation. An ineffective condenser fan can cause high pressure in the system, leading to overheating and inefficient cooling. Ensure the fan blades spin freely and the motor functions correctly. Replace any faulty components.
Inspect the compressor for issues. If the compressor fails to start or makes strange noises, it might be experiencing electrical problems or mechanical failures. Verify the voltage at the compressor terminals and ensure the contactor is functioning. Check for signs of wear or damage and replace the compressor if necessary.
Monitor the system’s superheat and subcooling values to ensure they fall within manufacturer specifications. Deviations from these values often indicate improper refrigerant charge or system blockages. Adjust the refrigerant charge accordingly and clear any obstructions to restore optimal performance.
Conclusion
So, you’ve mastered the art of using HVAC gauges—congrats, you’re now an elite member of the “I Can Read Pressure Levels” club.
Remember, calibrate those gauges like your HVAC system’s life depends on it (because it does), and ensure connections are tighter than your wallet after a shopping spree.
Monitor those readings religiously; don’t let fluctuations surprise you like a plot twist in a bad movie.
Happy troubleshooting, HVAC hero!