In the world of digital image editing, GIMP stands out as a powerful, open-source alternative to expensive software like Adobe Photoshop. Its versatility makes it a favorite among hobbyists and professionals alike, enabling users to perform intricate tasks such as photo retouching, image composition, and graphic design. One of the most common tasks in image editing is cutting out unwanted elements or backgrounds, a process that can often leave behind unwanted residues. In this comprehensive guide, we will explore how to effectively cut out GIMP residue, allowing you to achieve clean and polished results.
Whether you’re editing photographs, creating digital art, or designing graphics, understanding how to eliminate residue is essential for producing high-quality images. This article will cover everything from basic selection tools to advanced techniques, equipping you with the knowledge needed to tackle even the most challenging editing projects.
Understanding GIMP: An Introduction to Raster Editing
Before we dive into the specifics of cutting out residue, let’s take a moment to understand what GIMP is and why it’s such a valuable tool for image editing.
What is GIMP?
GIMP, which stands for GNU Image Manipulation Program, is a free and open-source raster graphics editor. It was first released in 1996 and has since become one of the most popular image editing programs available, thanks to its extensive features and user-friendly interface. GIMP is compatible with various operating systems, including Windows, macOS, and Linux, making it accessible to a wide range of users.
Key Features of GIMP
- Layer Support: Like Photoshop, GIMP supports multiple layers, allowing for non-destructive editing.
- Selection Tools: GIMP offers a variety of selection tools, such as rectangle, ellipse, and lasso, to isolate specific areas of an image.
- Color Correction: Users can adjust colors, contrast, and brightness to enhance image quality.
- Filters and Effects: GIMP includes numerous filters and effects to add creative touches to your projects.
- Customizable Interface: Users can customize the interface to suit their preferences and workflow.
Why Choose GIMP?
GIMP is an excellent choice for those seeking a cost-effective and powerful image editing solution. Its open-source nature means that it is continuously updated and improved by a community of developers, ensuring that users have access to the latest features and tools. Moreover, GIMP’s versatility makes it suitable for various tasks, from simple photo retouching to complex graphic design projects.
Getting Started with GIMP: Setting Up Your Workspace
Before we begin cutting out residue, it’s important to set up your GIMP workspace for optimal performance. Here are some steps to help you get started:
Installing GIMP
- Download GIMP: Visit the official GIMP website to download the latest version of the software for your operating system.
- Install the Program: Follow the installation instructions provided for your specific OS. The process is straightforward and should only take a few minutes.
- Launch GIMP: Once installed, open GIMP to access its interface and tools.
Customizing Your Workspace
Cut Out GIMP Residue interface can be customized to fit your editing needs. Here are some tips for setting up your workspace:
- Toolbox: Familiarize yourself with the toolbox, which contains essential editing tools like selection, brush, eraser, and more.
- Layers Panel: The layers panel is crucial for managing different elements of your project. Ensure it’s visible by navigating to Windows > Dockable Dialogs > Layers.
- Preferences: Adjust preferences by going to Edit > Preferences. Here, you can customize themes, keyboard shortcuts, and more to streamline your workflow.
Cutting Out Residue: Tools and Techniques
Now that you have GIMP set up, let’s explore how to cut out residue effectively. We’ll cover various tools and techniques to help you achieve clean, professional-looking results.
Understanding Residue in Image Editing
Residue in image editing refers to unwanted remnants that may be left behind after cutting out or isolating parts of an image. This can include stray pixels, jagged edges, or leftover backgrounds that diminish the overall quality of the final image. Eliminating residue is crucial for achieving a polished look, especially when integrating images into different backgrounds or designs.
Selection Tools: The Foundation of Image Isolation
GIMP offers several selection tools that form the foundation for cutting out unwanted elements. Let’s explore these tools and how to use them effectively:
1. Rectangle and Ellipse Select Tools
- Rectangle Select Tool: Ideal for selecting rectangular or square areas within an image. To use, click on the tool and drag to create a selection.
- Ellipse Select Tool: Perfect for circular or elliptical selections. Similar to the rectangle tool, click and drag to define the selection area.
Tip: Hold the Shift key while dragging to constrain the proportions of the selection (e.g., perfect squares or circles).
2. Free Select (Lasso) Tool
The Free Select Tool, also known as the Lasso Tool, allows for more precise, freehand selections. This tool is especially useful for selecting irregularly shaped areas.
How to Use:
- Select the Free Select Tool from the toolbox.
- Click to create points around the area you wish to select, and complete the selection by connecting the last point to the starting point.
- Adjust the selection by dragging points if needed.
3. Fuzzy Select (Magic Wand) Tool
The Fuzzy Select Tool, often called the Magic Wand, selects areas based on color similarity. It’s useful for selecting contiguous areas of similar colors, such as backgrounds or solid-colored objects.
How to Use:
- Select the Fuzzy Select Tool.
- Click on the area you wish to select. Adjust the threshold in the tool options to increase or decrease the selection range.
- Hold the Shift key to add to the selection or the Ctrl key to subtract from it.
4. Select by Color Tool
The Select by Color Tool is similar to the Fuzzy Select Tool but selects all pixels of a specific color throughout the entire image.
How to Use:
- Choose the Select by Color Tool from the toolbox.
- Click on the color you want to select. Use the threshold option to refine the selection.
- Modify the selection as needed using the Shift or Ctrl keys.
Advanced Techniques: Refining Selections and Removing Residue
After making an initial selection, refining it is key to ensuring no residue is left behind. Here are advanced techniques to enhance your selections:
1. Refine Edge Tool
The Refine Edge Tool is invaluable for cleaning up selections, especially when working with complex subjects like hair or fur.
How to Use:
- Make your initial selection using any of the selection tools.
- Go to Select > Refine Edge. This opens a dialog box with various options for adjusting the selection.
- Use the Feather slider to smooth out the edges and the Contract/Expand slider to adjust the selection size.
- Preview changes in real-time to ensure a seamless blend with the background.
2. Alpha Channel and Transparency
Adding an alpha channel to your image allows for transparent backgrounds, essential for removing unwanted areas without leaving residue.
How to Use:
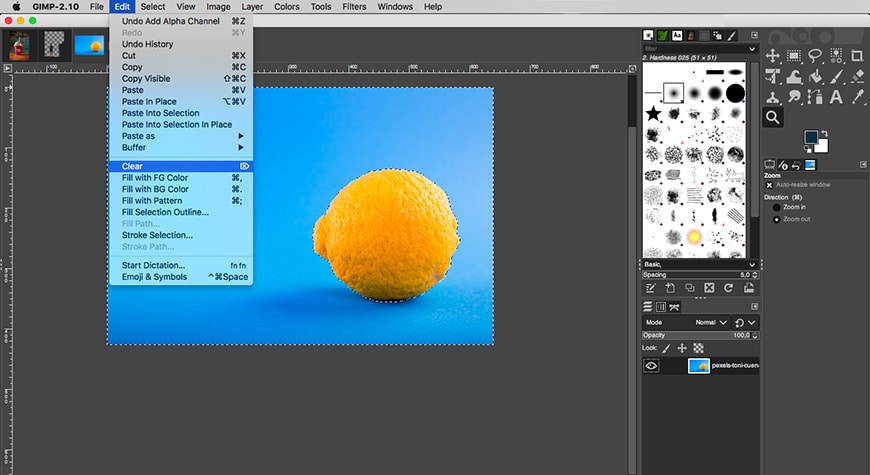
- Right-click on the layer in the Layers panel and select Add Alpha Channel.
- Make your selection and press Delete to remove the selected area, revealing a transparent background.
- Use the Eraser Tool to manually clean up any remaining stray pixels.
3. Masking Techniques
Layer masks provide a non-destructive way to hide parts of a layer, offering greater control over residue removal.
How to Use:
- Right-click on the layer and select Add Layer Mask.
- Choose White (Full Opacity) or Black (Full Transparency) as the initial state.
- Use the Brush Tool with black and white colors to paint on the mask, hiding or revealing parts of the layer.
- Fine-tune the mask using different brush sizes and opacities for precision.
Practical Example: Cutting Out a Subject with GIMP
Let’s walk through a practical example of cutting out a subject from a photo using GIMP. This step-by-step guide will demonstrate the techniques discussed above:
Step 1: Open Your Image
- Launch GIMP and open the image you want to edit by navigating to File > Open.
Step 2: Make an Initial Selection
- Choose a selection tool based on the shape and complexity of the subject. For this example, we’ll use the Free Select Tool.
- Carefully outline the subject, clicking to create points and closing the selection loop.
Step 3: Refine the Selection
- Navigate to Select > Refine Edge to smooth out the selection and adjust the edges for a natural look.
- Use the feather and contract/expand sliders to perfect the selection.
Step 4: Add an Alpha Channel
- Right-click on the image layer in the Layers panel and select Add Alpha Channel.
- Press Delete to remove the background, revealing a transparent layer.
Step 5: Clean Up Residue
- Utilize the Eraser Tool to remove any leftover pixels or unwanted residue around the subject.
- For precise control, consider using a layer mask and refining with the Brush Tool.
Step 6: Save Your Work
- Once satisfied with the results, save your edited image by going to File > Export As and selecting your desired file format.
Tips and Tricks for Residue-Free Editing
Achieving residue-free results requires practice and attention to detail. Here are some additional tips and tricks to enhance your editing skills:
1. Zoom In for Precision
Zoom in on the image to see fine details and ensure clean edges. This is especially helpful when working with intricate subjects like hair or foliage.
2. Use Keyboard Shortcuts
Familiarize yourself with GIMP’s keyboard shortcuts to speed up your workflow. For example, use Ctrl + Z to undo actions or Ctrl + Shift + A to deselect a selection.
3. Experiment with Brush Settings
When using the Eraser or Brush Tool, experiment with different brush shapes, sizes, and hardness levels to achieve the desired effect.
4. Take Advantage of Layer Modes
Layer modes can help blend layers seamlessly, reducing visible residue. Experiment with modes like Overlay, Multiply, and Screen to enhance your compositions.
5. Practice Non-Destructive Editing
Whenever possible, use non-destructive editing techniques like masks and adjustment layers to preserve the original image and make reversible changes.
Troubleshooting Common Issues
Despite your best efforts, you may encounter challenges while cutting out residue in GIMP. Here are some common issues and solutions:
1. Jagged Edges
Solution: Increase the feathering radius in the Refine Edge Tool or use the Blur Tool to smooth out jagged edges.
2. Stray Pixels
Solution: Zoom in and use the Eraser Tool to remove stray pixels manually, or use a layer mask for more precise control.
3. Color Fringing
Solution: Use the Select by Color Tool to isolate and desaturate fringed areas, or apply a small Gaussian Blur to blend them with the background.
Exploring Alternative Tools for Residue Removal
While GIMP is a robust image editor, other tools and software can assist in residue removal and enhance your editing workflow. Here are some alternatives worth exploring:
1. Inkscape
Inkscape is an open-source vector graphics editor that complements GIMP’s raster editing capabilities. It is particularly useful for creating clean vector shapes and illustrations.
2. Krita
Krita is another open-source program designed for digital painting and illustration. It offers a wide range of brushes and advanced masking tools for detailed editing.
3. Adobe Photoshop (Paid Option)
For those willing to invest in professional software, Adobe Photoshop offers extensive features and advanced tools for residue removal and image manipulation.
Conclusion
Cut Out GIMP Residue is an essential skill for anyone involved in digital image editing. By understanding the tools and techniques available in GIMP, you can achieve clean and polished results that elevate the quality of your projects.
From basic selection tools to advanced masking techniques, this comprehensive guide has equipped you with the knowledge needed to tackle even the most challenging editing tasks and Cut Out GIMP Residue. By practicing and experimenting with different approaches, you’ll continue to refine your skills and produce professional-grade images with Cut Out GIMP Residue.


